Friday, May 16, 2014

Celebrate! A Giveaway

500 followers! 52 Quilts in 52 Weeks celebrates 500 followers on Bloglovin' -- plus nearly 700 on Google Friend Connect! 

When the number of followers topped 1000 on the two reported "following" methods, I wanted to celebrate. The DH pointed out that there might be many duplicates, as Bloglovin' was launched well after 52 Quilts began. So I decided to wait until there were 500 followers on Bloglovin' to celebrate.

And that day was earlier this week. Thank you!

I think this calls for a major giveaway, don't you? I searched for the perfect "prize" and came up with a fat quarter bundle of Kona's Summer '13 Palette cotton solids.


That's 28 fat quarters -- 7 full yards of Kona cotton goodness. Plus anything else I find to toss in the box for you.

Want it? Here's how to get it:

  1. This giveaway is to celebrate followers of 52 Quilts in 52 weeks, so you must be a follower. Either by Bloglovin' or Google Friend Connect, or via email.
  2. Make a comment on this post to say you're a follower.
  3. For another entry, follow @52Quilts on Instagram. Comment to say you're a follower.
  4. For a third entry, "like" 52 Quilts on Facebook. Comment to say you've "liked" 52 Quilts.
  5. International entries welcome!
  6. No-reply comments will be disregarded unless contact information is included.
  7. Giveaway ends at noon MDT (Mountain Daylight Time) next Saturday, May 24.

Thank you for making 52 Quilts in 52 Weeks a success -- you are the reason I am here!

From the desk of your auntmartisignature

Wednesday, May 14, 2014

WIP Wednesday: 111 Farmer's Wife Blocks

All 111 Farmer's Wife blocks are pieced and ready to sash! Thank you, Marti Michell.

Over the four years of 52 Quilts in 52 Weeks, 16 posts have been about this quilt. It's about time to finish it, don't you think?

I started this massive project in the Spring of 2010, when I first saw the book at the Pueblo Quilt Expo. I spied the book and a fat quarter tower of Civil War reproduction fabrics at a booth from Texas. In the next aisle, I saw that my LQS, High Country Quilts, was also selling the book. I asked Jean about it and she said they were doing it as a BOM.  Karen led the group, and also designed foundation piecing patterns for many of the more difficult blocks.

I plugged along for a couple of years, making two or three blocks a month. But not really making a lot of progress.  Then, last year I saw that Marti Michell had written conversion charts for using her From Marti Michell templates to make these complex 6.5" blocks. Yay!

Progress at last.  My only surviving brother and his wife will celebrate 50 years of marriage this June. (I'll try to find the photo of my sister and me wearing dresses made by my mother for the wedding.) So I decided, since he is the only Dyer boy who became a Farmer, they should have this quilt.  And the pressure is on!

A few of the blocks had come out smaller than 6.5" -- rather than try to compensate for that in the sashing strips, I decided to re-sew them using Marti's templates. And last night, I finished the last block.


No sashing yet, I'll decide what fabric to use today when I visit Ruth's Stitchery for Wednesday Block Party. But all the blocks are finished! All the blocks are finished! All the blocks are finished!

Here are some closeups of a few of my favorite blocks.

First, the Red Cross block. This one isn't in the book, it was a special gift design from Karen. I used it to replace a block that was a duplicate.


I'm quite proud of this block, #94, Tall Pine Tree. It is one of about 10 blocks for which Marti did not write a conversion. So I used my Bloc-Loc Half Rectangle Triangle ruler and made my own.


This is one I re-made because it was too small, #99, Women's Christian Temperance Union. I used the colors of the Women's Suffrage Movement, purple, white and green.


On the left is #45, Grape Basket. That's 30 pieces in a 6.5" block. Ahem. On the right is one that would have been impossible without Karen's foundation piecing design, Night and Day.


Linking up to Let's Bee Social at Sew Fresh Quilts.


And WIP Wednesday at Freshly Pieced.

WIP Wednesday at Freshly Pieced

If blog posts are scant the next week, it's because I'm busily sashing this doozy of a quilt!


From the desk of your auntmartisignature

Monday, May 12, 2014

On the Design Wall: Last of the Farmer's Wife Blocks

I've finally completed the last four of my Farmer'w Wife bocks!

This isn't the oldest WIP I've ever had, but it's probably the oldest established permanent floating WIP in my history!

I started the Farmer's Wife quilt in the Spring of 2010 after I saw the book at the Pueblo Quilt Expo. Being a Farmer's Daughter, I thought it would be a fun quilt to make. Lucky for me, Karen at High Country Quilts was offering it as a BOM.  She designed foundation-pieced patterns for many of the more difficult blocks. I plugged away at the blocks until early in 2013, when Marti Michell released her From Marti Michell templates conversion chart for the quilt. Using the templates did make the blocks easier to piece at the perfect 6.5" square!

I had only a few blocks left to make when I decided this would be the perfect 50th anniversary gift for my brother and his wife. He is the only of my brothers who became a farmer.

And so, voila -- the last four of the 111 Farmer's Wife blocks:


The blocks, clockwise, are: #42 Fruit Basket; #50 Honey's Choice; #101 Wedding Ring; and #106 Wild Rose & Square.

Sashing and setting this quilt is going to be challenging, as not all of my blocks are exactly 6.5" square! Since the anniversary party is scheduled for June 27, I have less than one month to finish it -- so this will be the only thing I work on for the next few weeks.

I just noticed 52 Quilts in 52 Weeks has 499 followers on Bloglovin'. I'm thinking the 500th follower will call for a major giveaway. Keep watching this space!

From the desk of your auntmartisignature

Friday, May 9, 2014

One Fast Friday Finish

That was one fast finish! I just started knitting with my Mother's Day yarn on Wednesday morning, and I finished my Shawlcowl Pullover last evening.


I love the way this little shawl - cowl works. It has the look of a small shawl, but it is knit in the round, so it wears like a cowl.

Not to mention this photo shows the true-blue of Jilly's gorgeous superwash merino.

Here's what the back looks like:


Very clever, no? I'll be watching designer Susan Elston on Ravelry for more of her patterns.

If you missed the story of this yarn, click back to yesterday's post. The Shawlcowl took only 45 grams of the Jilly dream yarn, so I have 70 grams left. It's really a sock yarn, and I don't knit socks anymore. Any ideas what I should do with the remaining 250+ yards of this gorgeous stuff?

Linking up to fo friday with Tami's Amis.


Younger Son aka My Little Sailor should be posting this year's Mother's Day greeting tomorrow. I'll be watching for it, will you?


From the desk of your auntmartisignature

Thursday, May 8, 2014

Thursday Knits: Happy Mama, Happy Mother's Day!

Last year, the Younger Son, aka My Little Sailor, published a touching post on 52 Quilts in 52 Weeks. Yeah. He made me cry. I'm sure that was his plan.

This year, he ordered this gorgeous yarn gifty from The Loopy Ewe.

2014 Mother's Day/Spring Kit from The Loopy Ewe

I opened it thinking "oh, I don't remember ordering anything from the Loopy Ewe."

Yum!

The yarn is a gorgeous 100% superwash merino in an exclusive hand-dyed blue named "Finally, Spring!"

I knew just what I wanted to knit. It's the "Shawlcowl Pullover" by Susan Elston, available on Ravelry.

I'm further along than this photo shows, but I wanted to get this post up for Thursday Knits!


The photo by The Loopy Ewe is much more true to the color of the yarn. It reminds me of the Colorado cerulean blue sky.

Happy Mother's Day to all who are mothers, or all who have a mother!


From the desk of your auntmartisignature

Wednesday, May 7, 2014

WIP Wednesday

I'm desperately behind on my Block of the Month projects. Because I wanted to share some new Flying Geese tricks yesterday, I'm up-to-date on at least one!

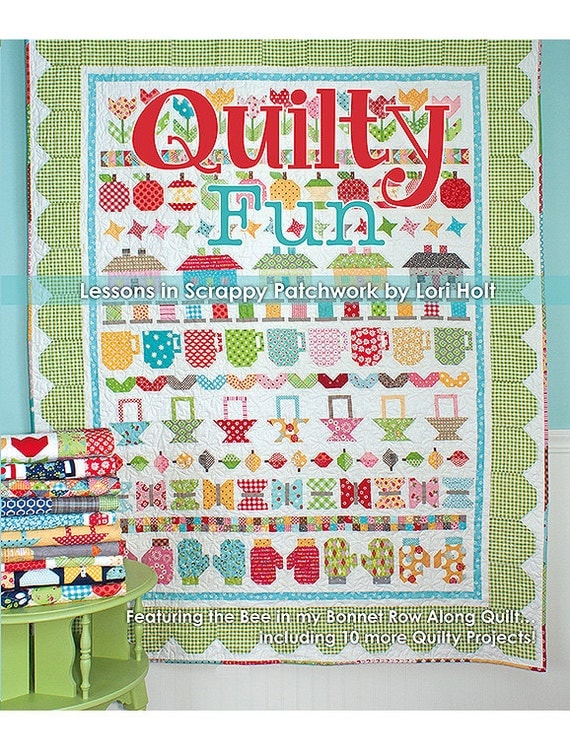
One of my Block Parties at Ruth's Stitchery is making Lori Holt's "Quilty Fun" row quilt.

Quilty Fun "Lessons in Scrappy Patchwork" by Lori Holt
We've completed five rows so far. This week I finished 48 teeny tiny Flying Geese for row 5:


Oops -- I found the fifth row in my "Quilty Fun" bin after I took the photo.

Here are some close-up of this week's Flying Geese row:


Those "geese" are only 1.5" by 2" finished! I'm really pleased with the way they turned out.

I plan to have a sneak preview of my Mother's Day gifty from My Little Sailor tomorrow. Hope you'll come back to see how it's coming along!

From the desk of your auntmartisignature

Tuesday, May 6, 2014

Tuesday Tool: Perfect Flying Geese

I know I'm always complaining about Flying Geese. This time, I think I've found the way to make perfect Geese!

This method combines three other methods/tools. The basic idea is the same as the "No Waste Method for Making Flying Geese Units." The earliest reference to "No-Waste Flying Geese" I could find was published in 2000 by Patti Anderson. She published an excellent reference chart for making geese in any size, here. [BTW, Patti, if you see this post, I'm sorry I couldn't find a way to contact you to ask permission to reference your tutorial.]

The second tool is new to me. It's the "Corner Cutter" tool from Perkins Dry Goods. This tool uses the same dimensions as the No-Waste method, with the addition of a clever little tool to cut off the corners of the "wings" before they are sewn to the "goose" square.


Step three uses my favorite square-up ruler from Bloc_Loc:


Here we go with step-by-step instructions for perfectly sized flying geese:

1. Cut one large and four small squares according to the size of the finished geese desired.


2. Draw a line corner to corner on each small square. Stack the four squares so all edges are even.


3. Place the corner cutter tool on top of the stack of four small squares. See the little line that reads "Align raw edge here? There's one on either side of the Corner Cutter.


4. With both of those lines aligned on the raw edges of the small squares, you'll cut off the perfect amount of the corners.

5. Cut off one only one corner on all four small squares.


6. Your stack of four squares will look like this:


7. Place the small squares on top of the large square with the chopped-off corners in the center.


8. Stitch a scant 1/4" seam on either side of the center line.


9. Cut on the center line.


10. Press the "wings" away from the larger piece. See where you chopped off the corner using the Corner Cutter Tool? That curtails the extra layers that are there in the No-Waste method.


11.  Press both "wings" away from the larger piece (goose).


 12. Place the remaining two small squares on top of the two larger geese that already have "wings."


13. Again, sew a scant 1/4" on either side of the line and cut on that line. Press the "wings" away from the "goose."


14. Now it's time for the Bloc_Loc Flying Geese Ruler. As do all Bloc_Loc rulers, the Flying Geese ruler has a groove on the bottom that "locks" over the seam allowance. Trim all four sides.


Here are two tiny Flying Geese. The smaller one is .75" by 1.5" finished, the larger is 1" by 2" finished.


Even this tiny, with the three-method trick, they're perfect!


Like my nail polish? It's "Jewell" by Zoya.


Come back tomorrow to see what I'm doing with those tiny Flying Geese!


From the desk of your auntmartisignature