Friday, May 25, 2012

Finish it up Friday and What I Learned


 First, what I learned.  That song that's been running through my head all morning?  School's Out?  It's by Alice Cooper.  Thanks, Marta and Deb!  I'm embedding it here in honor of all the graduates this year (Emily, Peter, Justin!)


Also, yesterday I learned to make feathers on the longarm!  Well, sort of.  It's not my best thing.

I took a class from DeLoa Jones at NaLa's Quilt Shoppe in Fountain.  We spent the morning mastering (not) feathers -- but really, with a lot more practice, I think I will be able to quilt feathers.  I didn't think to take any photos, so you'll just have to take my word for it.

DeLoa was recently named the Machine Quilters Exposition Teacher of the Year.  And a good choice she is, because she really is a most excellent teacher.  You know that a good designer isn't always a good teacher, but DeLoa is both!

In the afternoon we learned about using rulers and stencils -- look what I made:


I know -- it looks like a big piece of freezer paper with pencil marks. Which it is.  Also, it's my own design from quilting stencils, learning how to combine various stencils and size the designs for the border of a quilt.  I can't wait to try using stencils for my own quilting!

Since it's Friday, here is the "Finish it up Friday" quilt top for this week.  This is the Strip Club sample for the June quilt  Both the pattern and the fabric are from Fig Tree & Co. The pattern is "Kiss Me," the "Jardin" option (that is, no applique').  The fabric is Callifornia Girl.  (Shoulda waited for the taller quilt holder, huh?)


I think this one will go to a favorite California Girl, who was my very first follower on 52 Quilts in 52 Weeks!


From the desk of your
auntmartisignature

Wednesday, May 23, 2012

WIP Wednesday: Kiss Me

After enjoying an entire, uninterrupted weekend to sew at Quilt Retreat, I'm finding it hard to finish a single quilt top!

In process today is the June Strip Club sample:

The pattern and fabric both are from Fig Tree & Co.  The pattern is "Kiss Me,"  the "Jardin" option (no applique'!) and the fabric is "California Girl."  It will have a sawtooth border and border of the green floral from the California Girl line.  If I can concentrate long enough to finish it!

The photo looks a little dark -- because we are about to have the first afternoon thunderstorm of the summer season.  Luckily, the rain held off until graduation at the US Air Force Academy was complete.

Linking up to WIP Wednesday at Freshly Pieced:


From the desk of your
auntmartisignature

Tuesday, May 22, 2012

Tuesday Tutorial: Susie's Magic Binding

There is now a video of this technique. Go to this post to watch the video.

I met Susie at Quilting in the Pines last weekend.  She drives a pumpkin orange (or Tangerine Tango, the color of the year!) Audi TT.  And she demonstrated the coolest completely-machine-sewn binding I've ever seen!

Here's how:

1.  For this technique, you will need a main binding color and an accent color.  Of course, you can use the same color for both -- but why bother with this technique, then?


2.  Trim the excess batting back backing from your quilt.  Then measure the perimeter and add 10" or so.

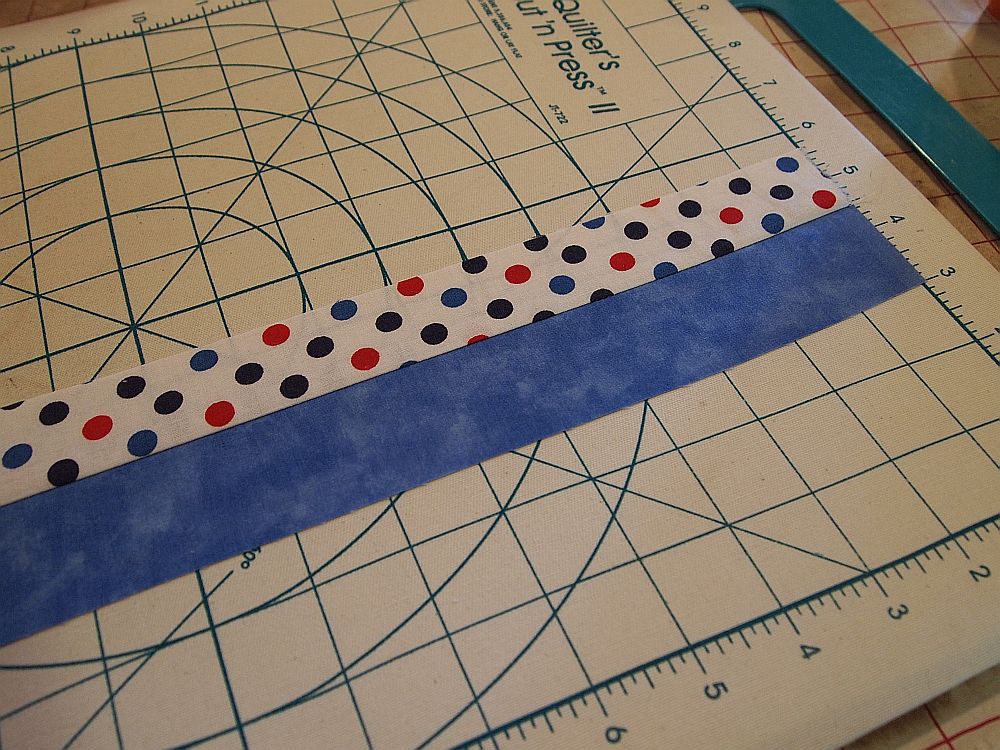
3.  Cut as many strips of the main (outer) binding fabric as you need to total the perimeter of your quilt at 1 1/2" wide.

4.  Cut the same number of flange (accent) strips at 1 3/4".

5.  Sew the strips of each fabric together end to end.  I always use a mitered join to minimize bulk.


6.  Sew the main color and the accent color together lengthwise using a 1/4" seam.  You now have two strips equal to the perimeter of your quilt.  
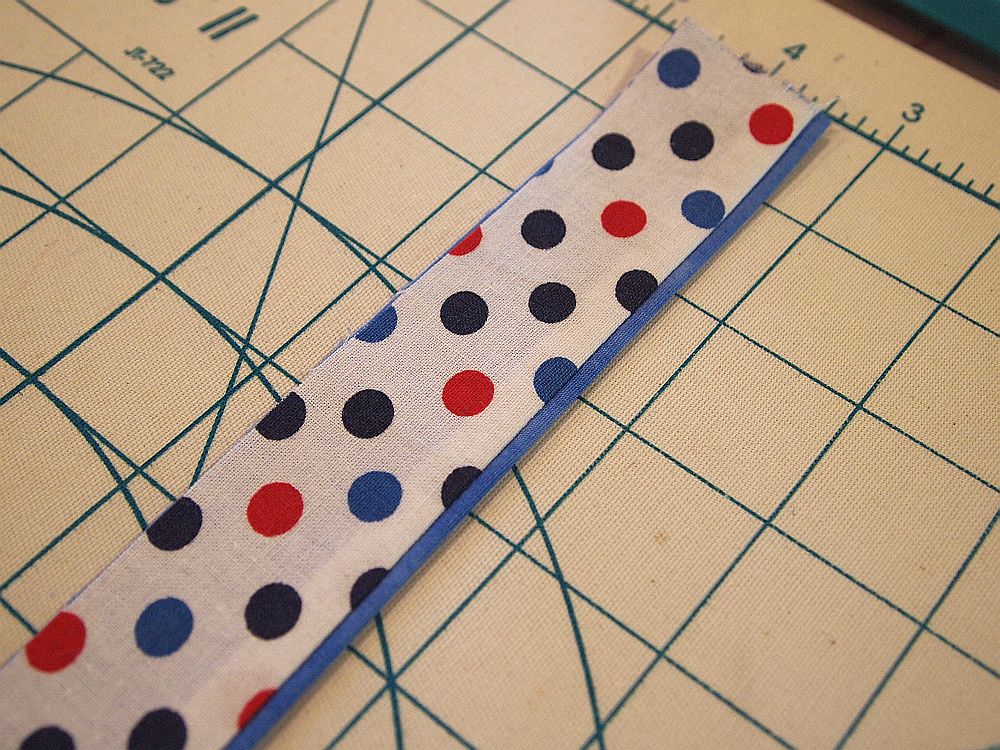
7.  Press toward the main (1 1/2" strip) fabric.

8.  Then press lengthwise with wrong sides together and raw edges even.  See how a narrow piping/flange appears when you meet the raw edges?

9.  Leave a 10" tail and begin sewing the binding to the back side of your quilt , with the contrast color facing up, using a 1/4" seam.

10.  In January I wrote a tutorial on mitering binding corners.  It also shows how to join the two ends of the binding.

11.  Once the binding is attached all the way around your quilt, lightly press the binding toward the cut edge.  This will make wrapping the binding to the front side of the quilt easier.

12.  Now wrap the binding to the front, and using thread that matches the flange (or use Superior Threads' Mono Poly) "stitch in the ditch" between the flange and the main binding fabric.

Miter the corners as you would any binding:


13.  Join the two ends of the binding as shown in my January tutorial, with this exception.  In order to make the flange meet evenly, place a pin through the seam line from the wrong side:
 then through the seam line of the right side of the opposite end of the binding:
 (This is a sample -- not the actual binding on the quilt!)  Sew across the two ends of the binding at a 45 degree angle:
 Be sure your stitching crosses the pin exactly where it went through the seams:
And you'll have a perfect join!

Doesn't this technique look great?  And it's completely done by machine -- no tedious hand stitching the binding in place!

According to Susie, this technique is approved for use on Quilts of Valor (previously, they required bindings be hand-sewn in place).

This will certainly be my binding method of choice from now on!  Thanks, Susie!

Addendum

Several readers have asked me to show what the reverse side of the quilt looks like when this binding method is used.  Here is a photo from Quiltmaker's Quilty Pleasures blog showing the reverse of my Mandarin Express Scrap Squad quilt:

Can you see the single line of stitching just to the left of the binding at the right-hand side of the photo? That's the bobbin thread from stitching in the ditch of the Magic Binding flange.

Here's another view, also showing the lovely machine quilting by Ann Reinelt:


Nice, huh? Now, go forth and bind!


From the desk of your
auntmartisignature


Please note that because of an increasing amount of spam, comments have been disallowed on this post. Thanks for all your kind comments, but I know you don't want to read advertisements here, either!

Monday, May 21, 2012

Mystery Monday

This week's Mystery Monday is from the class I took last weekend at Quilt in the Pines retreat.  Carol Anne was right, up until the very last "clue," I thought this quilt would be a diagonal set.  The blue fabrics made me think of Payette Lake at sunset:


So I've named Quilt #29 for 2012 "Mystery by the Lake."
 
The best part about taking classes at Granny's Attic retreat is, Lori cuts all the fabric for your project!  All you do is sit down and sew -- I love that!  The dark blue fabric is "Cape Cod" by Paintbrush Studio.  I forgot to ask what the light blue is, and since I didn't do the cutting, I don't have a selvedge to look at.
 The fabric has little oriental fans in blue and a goldy-green color My Little Sailor calls Somebody Isn't Drinking Enough Water.

My quilt holder said, "Come take a photo from the reverse side, it looks like stained glass."  It does, doesn't it?

One last photo from my weekend in Salt Lake City.  As a special treat, the HMQS hosts organized a trip to a rehearsal of the Mormon Tabernacle Choir. Hearing the 350+ voices in the perfect acoustics of the Tabernacle is a thrill, whether you're musical or not.

 
Tomorrow's Tuesday Tutorial is Susie's Magic Binding -- come back and learn how to do an elegant binding with piping, all by machine!

From the desk of your
auntmartisignature

Sunday, May 20, 2012

Sunday is for Scraps -- and Granny Squares

 But first, a photo from quilt camp.  This is Payette Lake in Idaho, where I went to Camp Alice Pittenger for many years as a Girl Scout, and where I now attend Quilt Retreat with Granny's Attic:


I've managed to resist the Granny Square block from Blue Elephant Stitches, until today.  I wanted to make a red, white and blue candle mat, and remembered this tutorial by Jolene. So I opened my 2 1/2" squares scrap drawer and pulled out some red and blue squares:


(Why, yes, that is only a small portion of my 2 1/2" squares.)

I laid out the red and blue squares and added some white squares to get this block: 


Rather than use a straight sashing, I decided to add triangles to the four sides and get a square mat.  Adhering to the "right tool for the job" policy, I pulled out my Omnigrid 98L ruler.  Since my granny square block is 9" raw-edge to raw-edge, I placed the 98L ruler on a regular ruler and found I needed to cut the setting strips 5" wide.  Then it's easy to line up the "9" on the 98L ruler with the edge of the 5" strip:

 
And cut four setting triangles:


When sewing triangles to a straight edge, don't try to "eyeball" the lineup.  They won't come out even. (Ask me.  I know.)  Fold the setting triangle in half and finger-press a crease in the center.  Do the same for the block.

Now pin the setting triangles to the opposite sides of the block and sew:


It's easier to sew with this side up, so you can see where the seams on the squares meet:


See?  Nice, sharp points!


And here is the finished block:


Placemats and hot pads are a good way to use up scrap batting.  With the increased price of cotton, I save every scrap nowadays!  If the scrap isn't big enough for the whole block, sew two pieces together.  First, place one piece slightly over the second and cut a curvy line through both pieces:


Like this:


Then place one piece slightly overlapping the other and sew together with a three-step zigzag stitch, set to the widest stitch width.


Now we're ready to quilt the placemat.  I love sulky KK2000 Temporary Spray Adhesive for basting, it's much easier than pinning:


I quilted with my new Superior Threads King Tut in color #919, "Freedom" at 1/4" from the seams of the colored squares:


Tune in Tuesday for a tutorial on Susie's Magic Binding and the finished mat.  


Today it is holding my blue candle, lit in honor of the sailors on the USS George Washington who are preparing to depart for their summer patrol of the Western Pacific.

23 They that go down to the sea in ships, that do business in great waters;
24 These see the works of the Lord, and his wonders in the deep.
Psalm 107:23-31
King James Version (KJV)


From the desk of your
auntmartisignature