
I met Susie at Quilting in the Pines last weekend. She drives a pumpkin orange (or Tangerine Tango, the color of the year!) Audi TT. And she demonstrated the coolest completely-machine-sewn binding I've ever seen!
Here's how:
1. For this technique, you will need a main binding color and an accent color. Of course, you can use the same color for both -- but why bother with this technique, then?
2. Trim the excess batting back backing from your quilt. Then measure the perimeter and add 10" or so.
3. Cut as many strips of the main (outer) binding fabric as you need to total the perimeter of your quilt at 1 1/2" wide.
4. Cut the same number of flange (accent) strips at 1 3/4".

5. Sew the strips of each fabric together end to end. I always use a mitered join to minimize bulk.

6. Sew the main color and the accent color together lengthwise using a 1/4" seam. You now have two strips equal to the perimeter of your quilt.
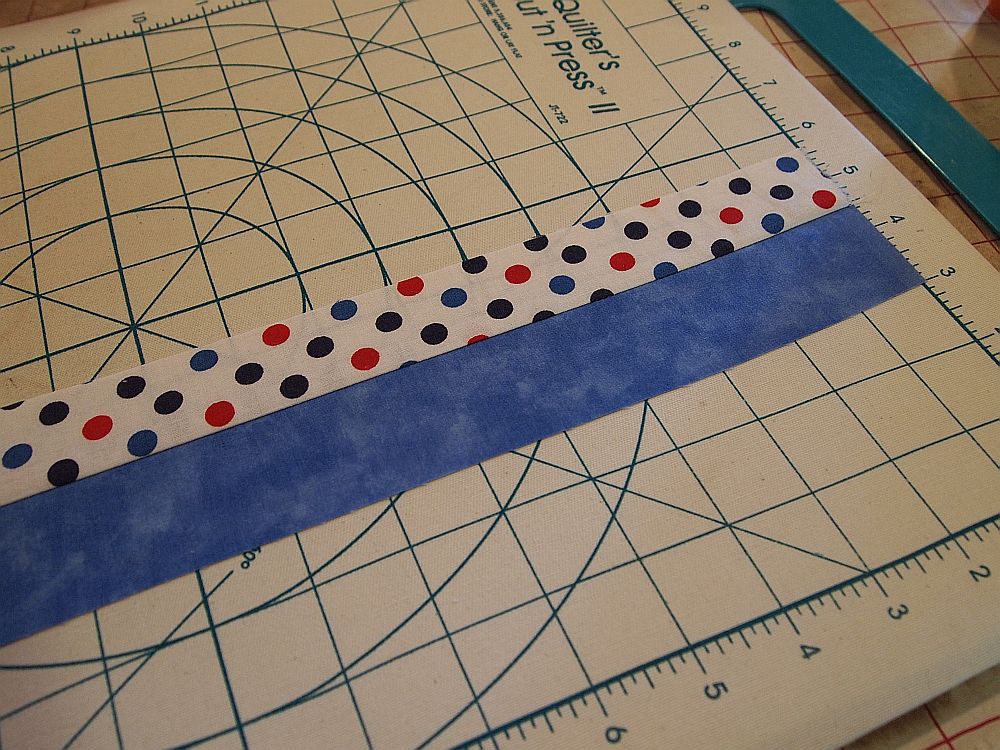
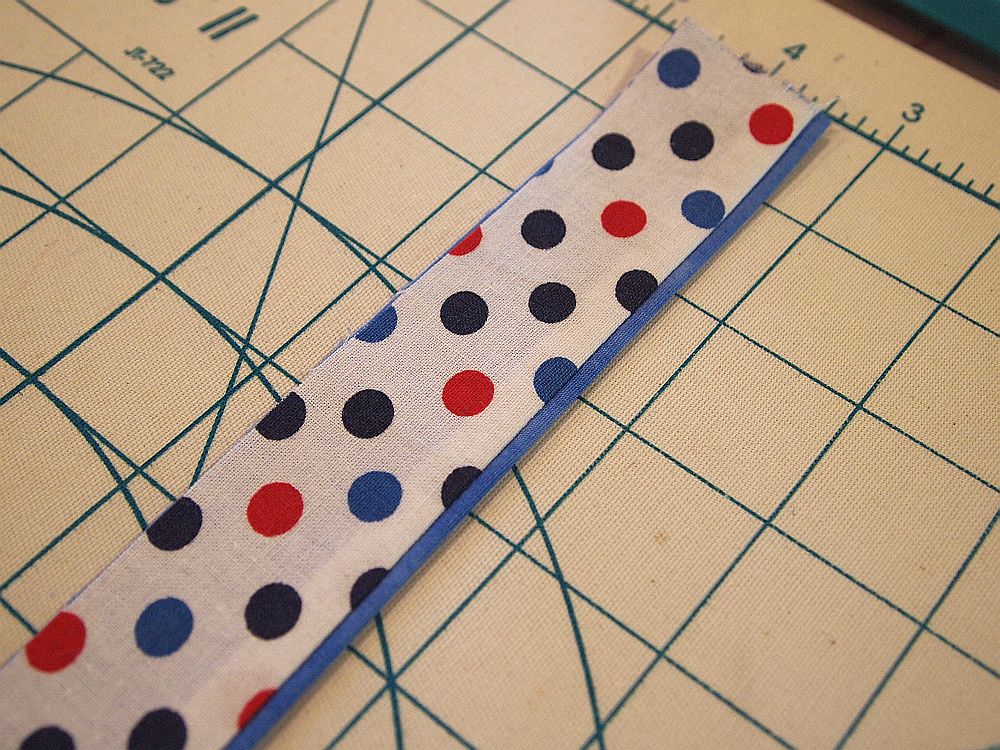
8. Then press lengthwise with wrong sides together and raw edges even. See how a narrow piping/flange appears when you meet the raw edges?
9. Leave a 10" tail and begin sewing the binding to the back side of your quilt , with the contrast color facing up, using a 1/4" seam.

10. In January I wrote a tutorial on mitering binding corners. It also shows how to join the two ends of the binding.
11. Once the binding is attached all the way around your quilt, lightly press the binding toward the cut edge. This will make wrapping the binding to the front side of the quilt easier.
12. Now wrap the binding to the front, and using thread that matches the flange (or use Superior Threads' Mono Poly) "stitch in the ditch" between the flange and the main binding fabric.


Doesn't this technique look great? And it's completely done by machine -- no tedious hand stitching the binding in place!


This will certainly be my binding method of choice from now on! Thanks, Susie!
Addendum
Several readers have asked me to show what the reverse side of the quilt looks like when this binding method is used. Here is a photo from Quiltmaker's Quilty Pleasures blog showing the reverse of my Mandarin Express Scrap Squad quilt:
Here's another view, also showing the lovely machine quilting by Ann Reinelt:

Nice, huh? Now, go forth and bind!
From the desk of your

Please note that because of an increasing amount of spam, comments have been disallowed on this post. Thanks for all your kind comments, but I know you don't want to read advertisements here, either!
Oh that looks so great! Adds a really nice touch to the quilt. Thanks for the tips and tutorial!
ReplyDeleteLove this, ive never seen it before. Definently going to try this
ReplyDeleteThanks for the how-to! I will mark this for the next binding!
ReplyDeleteFabulous idea - can't wait to try that!
ReplyDeleteThank you so much for my in-person tutorial last week while you were in Idaho. Who would have ever thought binding could be fun? I love it!
ReplyDeleteThis looks so amazing!! And great instructions. Thank you!
ReplyDeleteI love the idea of using two colors for the binding, certainly makes it pop. I do machine stitch all my bindings, but this is a cleaner look with less chance of messing up on the backside and having to stitch it again!
ReplyDeleteWow, so different, lovely! Thanks for the tute!
ReplyDeleteThanks for posting this Marti! I will definetely be giving it a try, you make it look so easy :)
ReplyDeleteChrystal, I hope you will let me know how it works for you if you do try it!
DeleteI am so glad you posted this and the pictures are terrifically helpful!
ReplyDeleteMy notes from Susie's lesson are not as helpful. Thanks!-C. Albano
Thanks, Oh Quilt Camp Buddy! Hope you'll let me know how it works for you if you try it on your cute yellow quilt!
DeleteLooks amazing. I must try it!
ReplyDeletePs May I pin? please?
I love this!! Thanks for sharing and awesome technique!!!
ReplyDeleteThank you for this nice tutorial. I always sew my bindings completely by machine, but this method will be a nice change.
ReplyDeleteThank you for this tip and tute! I just taught my 93!! yr old Mom to make these corners for the baby blankets she is STILL making for her Greats and Great-Great Grandkids! Amazing and a Blessing!
ReplyDeleteLove this technique! Thank you!
ReplyDeleteHi. I came to your tutorial for Susie's Magic Binding via Pinterest. Looks great. One question: If you use thread matching the "flange" to machine stitch from the front, won't it show on the back? Thanks.
ReplyDeleteJean
The top thread doesn't have to match the bobbin thread and should not show if the machine tension is correct. First make a sample of the same "sandwich" and test.
DeleteJean, I always use Superior Threads polyester invisible thread in the top and something that matches the backing in the bottom.
DeleteThis is super!
ReplyDeleteI've been trying lots of different techniques to speed up my quilting including learning free motion quilting and machine binding. I can't wait to try this one, it looks really easy and I love the accent color!
ReplyDeleteMichelle at http://www.Quiltystuff.com
I had a chance to try it, it works great! Thank you so much.
DeleteMichelle
I definetly will try this because I have carpal tunnel and the hand stitching just kills my wrist. I have had 7 quilts in my closet this past year that need binding work but have been putting it off. Thank you. I'll let you know how it goes.
ReplyDeleteI have started attaching my binding by machine. Thank you so much for sharing a way that will make them even nicer.
ReplyDeleteI had two quilts ready to bind. I tried this magic binding and love the results. I just finished preparing the binding for the second quilt. Two strips 360" long to sew together takes a while, but is so worth it. It really adds a special touch.
DeleteThank you and thank Susie
Barbara
Oh my goodness. It looks so nice and custom made! Thank you for sharing this. I can't wait to try it on the quilt I'm making for that extra touch.
ReplyDeleteI am interested to know what the back side of the quilt looks like after stitching binding in the ditch. Could you show that also. Thanks in advance!
ReplyDeleteLOVE THIS! Can't wait to try it.
ReplyDeleteWhat an awesome finish. Thank you so much for sharing.
ReplyDeleteI can't wait to try this! It looks like it turns out as nice as the Ricky Tims Piped Binding, but is a lot simpler!
ReplyDeleteJust tried this and it's awesome! Thanks so much! I've tried other ways and this is the best.
ReplyDeleteFancy !!! Im totally doing this. How did I not know this ?!?!?! Your the best !
ReplyDeleteIm seriously like Rain man when it comes to binding. I am going to start practicing and see if I can get more proficient with it. Thanks for the tutorial. great.
ReplyDeleteI love this! Is it pin friendly? Would love to keep track of such an excellent tutorial!
ReplyDeleteOh my!!! I have hated Hated binding before and always lucked out and had someone to do it for me-- I tried it a couple of times and it turned out terrible- so I really wanted to "start" to finish a quilt- well with the help of this tutorial I actually did it!!!!! Thank you x ten thousand!!!!!
ReplyDeleteCame across this on Pinterest and gave it a whirl. I LOVE it. I will probably never hand sew a binding again!
ReplyDeleteI too would like to know what the back looks like. Anyone willing to share?
ReplyDeleteQuiltinlin from NJ;
ReplyDeleteHello, this is the frist time I am follow your pins. I have been quilting since 1999 and I can not wait to try out Susie's magic binding.
Thank you so much for this tip.
Thank you does not seem quite enough to say when you have given me a wonderful new way to add to my quilts! But...Thank you! I shall be using this as soon as I can get to that point on my 10 quilts that I have going at this time!
ReplyDeleteAlene
This is fantastic! Thank you! I've been looking for a good machine binding technique. Gwen
ReplyDeleteThis is amazing ... simple enough to do too! I am using this on my next binding for sure.
ReplyDeleteThanks so much
JulieinTN
I did this yesterday on a grandma quilt I had to finish in a hurry. It worked great! Loved it! thanks for this.
ReplyDeleteI have now done 3 quilts with this binding and it gets easier every time. it may take a little longer with the extra step of sewing the two colors together, but it is well worth the extra work!
DeleteI don't make many quilts anymore, but this wonderful method works well on smaller projects like totes. Gives them a real finished look.
ReplyDeleteThe directions are excellent and I can't wait to try this technique. Thanks for posting!
ReplyDeleteFresh and beautiful! Thanks for sharing!
ReplyDeleteSo pretty! Can't wait to try it. :)
ReplyDeleteHas anyone shown the back of the quilt ? Several comments requesting to see the back after .
ReplyDeleteThere is a picture of a corner of a quilt finished with this technique (showing both the front and the back) on Quiltmaker's blog "Quilty Pleasures". It looks like the bobbin thread was chosen to match the back. It looks really nice!
ReplyDeletehttp://www.quiltmaker.com/blogs/quiltypleasures/2013/02/qm-scrap-squad-aunt-martis-majestic-garden/
Thanks, Banjo -- I do match the bobbin thread to the backing. It makes one straight line of stitching that looks like another row of quilting on the back.
DeleteI can't wait to send this to several QOV making friends. Maybe we can get more made faster?
ReplyDeleteThat's actually really nice. Thanks for the tutorial. I like the dotted fabric a lot!
ReplyDeleteWonderful idea! Can't wait to try this. Thanks for sharing:)
ReplyDeleteThis is the BEST tutorial I have ever seen shared online. Great explanation... Great photos... and Great nails! Thanks for sharing. I LOVE this binding method!
ReplyDeleteHow does this quilt binding technique look from the back, once you stitch the binding down after wrapping to the front?
ReplyDeleteIt is unclear if the measurements of the binding width are such that the 'ditch' line will place the stitches in a place that will hide them? Can you share more on how this works when looking at the back?
thank you for shareing this interesting idea. It sure looks gorgeous from the front!
This comment has been removed by a blog administrator.
ReplyDeleteThank you
ReplyDeleteThis is fabulous! Thank you very much for this tutorial. I will use this technique straight away! So ingenious!
ReplyDeleteEsther
This comment has been removed by a blog administrator.
ReplyDeleteAnd this has what to do with the binding technique shown on this blog???????? Big DUH?????
DeleteBev, thank you -- your comment made me come back to this old post to see what it was you were writing about!
DeleteThis comment has been removed by a blog administrator.
ReplyDeleteThanks for the great tut ... I just finished a baby quilt set that has flanged bindings. I used your tut to learn how ... I linked to you from my blog. Hat Tip!
ReplyDeleteThis comment has been removed by a blog administrator.
ReplyDeleteWhat a great finish to a quilt!! Gives it that extra something. Thank you for the tutorial! And thanks to Bonnie Hunter for finding your blog and sharing the info.
ReplyDeleteI have shared this with my Facebook friends and on my blog too. Yesterday I had your tutorial open on the computer as I followed along and made my own!! Check out the photo on my blog www.stitchinggrandma.wordpress.com
DeleteI love how easy it was to make and what a pop of color it will add to my quilt!
Love it love it love it!! gonna give it try! thanks!
ReplyDeleteGreat tutorial!!!!!
ReplyDeleteYay! Thanks a bunch I have a quilt I need to bind and was not looking forward to it. Now I am.
ReplyDeleteThis is sooooo !! easy to do and neat and tidy should have had it previous.
ReplyDeleteWhat a clever idea to enhance a simple binding! I love it and surely will give it a try.
ReplyDeleteWow. I love it!
ReplyDeleteDefinitely going to try this on the charity quilt that I'm working on right now. Thanks so much for sharing.
ReplyDeleteThis comment has been removed by a blog administrator.
ReplyDeleteI loved this binding tutorial and just used it on my quilt...thanks! I linked you to my blog and have had lots of comments saying how much they like this method. :O)
ReplyDeleteThis comment has been removed by a blog administrator.
ReplyDeleteA year late and a dollar short! I just did a binding by hand, lie 10 minutes ago. WOW! this would have been wonderful!
ReplyDeleteYour pics and text are GREAT!!!!
Thank you,
Frummie
This comment has been removed by a blog administrator.
ReplyDeleteThis comment has been removed by a blog administrator.
ReplyDeleteLove the look of this! Thank you for your tute!!!
ReplyDeleteFrom Aunt Marti too
Wow! Thanks for the tutorial! :)
ReplyDeleteThis comment has been removed by a blog administrator.
ReplyDeleteThis comment has been removed by a blog administrator.
ReplyDeleteThis comment has been removed by a blog administrator.
ReplyDeleteThis comment has been removed by a blog administrator.
ReplyDeleteThis comment has been removed by a blog administrator.
ReplyDeleteThis comment has been removed by a blog administrator.
ReplyDeleteI did this binding and it was AWESOME !!!! Pictures on my blog.
ReplyDeletehttp://stitchinggrandma.wordpress.com/2013/05/26/loving-the-flange-2/
Thank you for the great tutorial!
Thank you. Very nice tutorial.
ReplyDeleteWhat's up with comments 88-92? Very strange way to drum up business and most definitely unprofessional.
ReplyDelete