Saturday, December 26, 2015

Best of 2015

How fun is this? Cheryl at Meadow Mist Designs is hosting a "Best of 2015" linky party!

Here are my "best ofs."


  • Posts with the most views

This is an easy one. Far and above, the all-time most viewed post is "Susie's Magic Binding."


In the three-and-a-half years since the tutorial was posted in May of 2012, it has received nearly 650,000 views!

  • Posts with the most comments
Not surprisingly, the most with the most comments is the Susie's Magic Binding video tutorial. Posted on February 2 of this year, it's also the second-most viewed post. It's on YouTube, here.


  • Posts that provoked the best discussions
The most fun and lively discussions have been on "giveaway" posts. I loved the ideas followers had for using the Tonga Treats strips package given away on the 600 Followers post. The winner was Becky H., who planned a bargello quilt using the strips.

  • Posts showing your favorite 2015 finishes

Another easy choice!  My favorite all-time (not just 2015!) finish is the "Farmer's Wife" quilt. I used Marti Michell's templates for about half the quilt -- much easier than the templates in the book! I sent the quit to Idaho for a 50th anniversary gift to my brother and sister-in-law. 


  • Posts of your best tutorials

Since we've already celebrated Susie's Magic Binding, my second-favorite tutorial is another binding tute, Jean's Genius Binding.  It's perfect when you don't want the flange of Susie's Magic Binding. Plus, my nails look great in these photos.


  • Posts that are simply your favorites

The monthly UFO Parade posts are always my favs. It's so much fun to see what those participating in the UFO Challenge have made. But my favorite personal post is another tutorial, the one for the "Folded Corner Clipper." This is my favorite tool for making 45-degree angle cuts. So much more precise than drawing a line and sewing across it!


Linking up to the Meadow Mist Designs "Best of 2015" linky party.

Best of 2015 Linky Party

I counted the quilts I've finished since returning home from Texas in October. Eight!  I need to get My Little Sailor busy with the camera and write a "finishes" post! 


Happy New Year, and happy quilting!

From the desk of your auntmartisignature

Tuesday, December 22, 2015

Winter is Here! A Quilt Block a Day Tutorial

Happy First Day of Winter! I promised an easy peasy block for the winter season, and what could be easier than a 9-patch block?


I'm making my 9-patches from scrappy off-whites and reds. Festive, huh?

You may think it's silly to write a tutorial for a 9-patch, but not everyone has made 9-patches. Here are some tips for making a perfect 9-patch.

Start with either 2½ squares or 2½ strips. I used strips for the center three squares and scrappy squares for the outside rows.

This is a great chance to check your ¼" seam. Three 2½" strips sewn together should measure exactly 6½" -- if it doesn't, adjust your seam now before you sew more strips together!


To press, first "set" the seam by pressing with the dark fabric on top.


Next, press the seams toward the dark (red). Be sure to press to the thread -- in other words, make sure there is no little fold over the seam. 


Repeat for the second seam:


After pressing, I place a wooden cutting board over the strip set and wait for the fabric to cool. This ensure the strata is perfectly flat.


If you sewed strips, cross-cut into 2½" pieces. A fast way to cut is to start by making a clean cut at the left edge,using an 8½" ruler. Then cut a 7½" piece. 


Next, move your ruler to the left and line up at the 5" mark. Make the second cut:


Move the ruler to the left again and line up at the 2½" mark. Make the third cut:


Repeat until the entire strata is cut.


Because you pressed toward the dark side, the seams will nest nicely together. I don't even use pins!


I chain piece 2½" squares together rather than sewing off onto a scrap of fabric. By the end of a day of sewing, I have several blocks complete!


Try always to sew with the top seam aiming away from you. That way, your strata will always be lined up.


Add two strata with the dark (red) at the outsides to either side of the center strata. Press these two seams to the center.


See that the vertical seams are pressed outward, and the horizontal seams are pressed inward.


 Again, place the wooden cutting board on the block to flatten it.

Repeat daily to make 90 total 9-patch blocks!


From the desk of your auntmartisignature

Monday, December 21, 2015

Design Wall Monday

What should be my last UFO of 2015 is on the design wall today.

It's "Aunt Sukey's Sampler" from "Five is Fabulous" by Marti Michell.


This was the 2014 "Block of the Month" project at Ruth's Stitchery


As with many UFOs. now that it is nearly finished, I could kick myself for taking so long to finish it! As soon as I finished the last block, I put all the blocks on the design wall. And fell in love! Every bit I added to this quilt, I liked it more. And now that there is just the last border (the medium blue), I can't wait to get it to the quilter and onto my bed. I especially love the tiny gingham checks in the setting blocks and cornerstones. 

Here's a closeup:


Most of the other fabrics are from Maywood.


Shoot, I cut off the selvedge identifier when I cut the setting triangles. And I must have trashed it back then, because I don't have any left. I don't know who the manufacturer of this pretty border fabric is -- but I do know I bought it at High Prairie Quilts in Parker. They still had some left last week when I stopped by on my way to the airport to pick up my co-author.

My 2015 UFO list has 15 projects on it. And only TWO have been crossed off! How is your UFO list looking?

Come back tomorrow to see the new "A Quilt Block a Day." I promise, it's an easy one!


From the desk of your auntmartisignature

Sunday, December 13, 2015

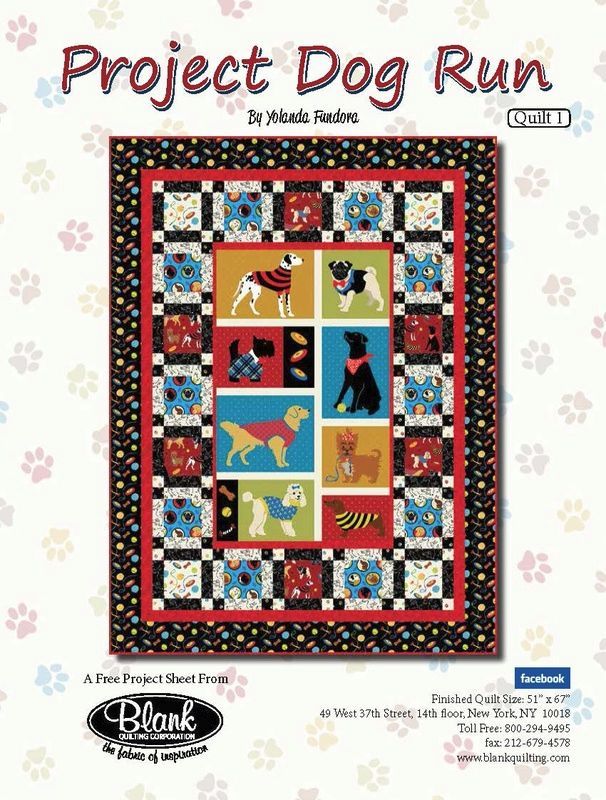
Sunday Stash: Project Dog Run

You knew working at Ruth's Stitchery was going to be dangerous, didn't you? 

But seriously, who could resist this cute line of fabric from Blank Quilting?


It's Project Dog Run -- and it even includes a white Standard Poodle, just like Jax! Jax is my friend's poodle. We got to be buddies when I spent time in Texas this summer. 

Blank Quilting even has a free project sheet that goes with this fabric line. I think I'll pick out just the dogs that Holly has owned, and make her a lap quilt.
 

Cute, huh? She doesn't follow the blog, so I'm safe sharing this with you!

One week until Winter Begins. How are you doing with your "A Quilt Block a Day" blocks?


From the desk of your auntmartisignature

Tuesday, December 1, 2015

Last UFO Parade for 2015

I often say, "This is how people get to be old and wonder where their lives went."

Well, that is true for this year! Of course, spending a few months in Texas kind of confused my internal time clock.

UFO Challengers have finished 180 projects this year. Looking back at previous years, last year there were 191 finishes, and in 2013 there were 157. That's a lot of UFO finished and released!

I even have a UFO of my own to share this month. It's the 2014 Bonnie Hunter Mystery, "Grand Illusion." I had all the pieces finished, but just got it put together this Thanksgiving weekend. We had so much cold and snow, I didn't leave the house (or the sewing room!) for four days.


If you've made this quilt yourself, you might notice mine is a little different. The directions call for 25 blocks, set 5 X 5. I used only 20 blocks in a 4 X 5 setting, and it fits the double bed in the downstairs bedroom perfectly! I've decided this is a "summer" quilt, so it won't be quilted until spring. I read on another blog that bamboo batting works well for lightweight quilts, so that's what I'll try.

And no, I'm not doing the 2015 mystery! Both my boys will be home for the week between Christmas and New Year's, so I don't want to be caught up in a new project.

In case you don't remember from the November Parade, the December UFO number is:


And now, on with the parade!

I love Debra's finish -- "Minions." Those little guys are so much fun! She bought this as a kit from Cozy Quilts in El Cajon (on my bucket list!) and plans to back it with either orange minkie or fleece.


Deb's second finish for the month is  "Dave's Irish Chain," made for her granddaughter for Christmas. Debra writes:
She just remodeled her bedroom with creams and greys and asked me to make her a quilt with blue, cream, grey, and teal. She will be surprised because I told her I didn't think I could get to it this year - surprise! surprise! even surprised myself. The pattern was from Fons & Porter's Love of Quilting, March/April 2008 issue.


Joy in Tennessee has had a busy month! She has three finishes to share this month.

First is a coffee bean table topper, which was made using a 60 degree ruler. It was started at a guild meeting, and then sat in my sewing room until I finally got it quilted and finished. Now it is perfect on my sofa table!


Next up is a fall table topper from the Winter 2012 Quilts & More. I loved the large hexagons and little bits of embroidery. It went together much faster than I thought it would, and looks great on my side table. 


Finally, I made a replacement pillowcase for my travel king size pillow. (My last one was washed by a helper with new maroon sheets, and the white stars are now pink.)


Your last comment made me laugh, Joy. I had the same discussion with my niece in Texas (about washing reds and whites together.) She didn't believe me -- but after her Mom got home, I overheard her saying "Aunt Marti was right about sorting the laundry!"
Love this finish by Pam in KC. All Kansas Troubles fabrics, the pattern is from Evelyn Sloppy's "40 Quick-Cut Quilts." 


This is quilt #9 of Pam's Crazy Challenge II -- 15 quilts and 25 or 26 pillowcases in 4 ½ months. She writes, 
"The good news, is it's not as bad as it sounds - I've got one quilt ready to bind and 3 more partially quilted. I do have doubts on whether or not I'll get my Christmas quilt and pillowcase(s) done. But there's always next year!"
Check out the details on Pam's blog, Pamela Avara Arts, here.
I always get a chuckle from the names Sandi gives her quilts. This one is "Komatose," and I'll let Sandi tell you about it:
November's UFO was my last UFO to finish for the year.  I stitched with a conviction on my UFOs this year since most of them were Bonnie Hunter designs.  As many of us are aware her projects are awesome, but can be very piece laden making the project take some time to complete.  My UFO list for 2015 had seven of her designs included. November's UFO #3, Komatose is anything but sleepy!  It is a design called Lazy Sunday that was first brought to us through Quiltmaker Magazine March/April 2013 issue as a Mystery Series.  It has since been republished in her book More Adventures with Leaders and Enders.  I used leftover blocks from another project on the border.  The unit is easy to sew, but in and of itself takes a bunch of time to complete.  Having some sewn already was terrific... Komatose is certainly one of my favorites to have stitched this year.  I loved sewing with all the bright happy fabrics.  Who would have expected pink and orange would look so well together.  It has to have been the teal centers that made it work.  Thanks to my Mom who helped me with the bright greens.  

You can read more about it on Sandi's blog, KwiltnKats, here.

Kerry has a gorgeous finish this month. I really admire the Feathered Star block, and this one is unique.


It's called "Batik Feathers" by Donna Lynn Thomas. Read about it on Kerry's Quilting, here.

One last goodie, from Mary J.  She is playing with the gorgeous fabrics of Jane Sassaman. Details and trial blocks on her blog, Zippy Quilts,  here, and here.


The November UFO Parade prize goes to Joy in TN -- congratulations, Joy! Please send your postal address, as I have some Christmas candies (quilt candies, that is!) to send to you.

Happy Holidays to all, and I hope you'll join us for the 2016 UFO Challenge!


From the desk of your auntmartisignature

Saturday, November 28, 2015

Blogiversary: Giveaway Winners

Thank you, all, for following 52 Quilts the past four years. And thank you especially to those who took the time to comment on the giveaway!

Without further ado, here are the four winners. I apologize that for some reason, Random.org won't let me copy the little "True Random Number Generator" box. But that's how I determined the winners!

Giveaway #1.


Goes to Sooli, who wrote:


Congratulations on your big 4th blogiversary! I think No. 1 is pretty cute! I follow through Blogger.

Giveaway #2.


Goes to Bec, who wrote:

I just found your website today so I'm sure I'm not eligible for the give-away, but wanted to let you know that I am impressed with the number of quilt tops you are able to finish in a year. I expected to see very simple uninteresting tops, but I was so wrong. You've got some truly beautiful quilts in your stack. :)

Giveaway #3.


Goes to Lalaluu, who wrote:

I am now following you via e-mail (through my Yahoo account - lalaluu @ yahoo . com), and I absolutely adore Kit #3, the Gee's Bend "Housetop" quilt. I'm from Alabama, and these quilts remind me of the ones my grandmother made.

Giveaway #4.


Goes to Lynn, who wrote


Congratulations on your 4th year! I enjoy your blog. It is Monaco for me!


Winners, please email your postal address to me so I can mail your prize -- as soon as the snow stops!


From the desk of your auntmartisignature

Tuesday, November 24, 2015

Tuesday Tute: Lining Up Sashing

Has this ever happened to you? You have all the blocks for a quilt made, you've attached the sashing -- then you realise the vertical sashing doesn't line up from block to block.

Aarrgghh!

There's a pretty simple fix for this problem. Here's how I lined up the sashing on my recent "Downton Abbey" quilt.

1. Attach the sashing to the vertical sides of the blocks. Remember, only the first block needs sashing on both left and right sides, the remainder of the blocks in the row only need sashing on the right-hand side.

2. Attach the horizontal sashing.

3. Lay out the row of blocks on a flat surface (cutting table, ironing board). Use a clear ruler and line it up across the seam between one vertical sashing and the block, so that it crosses the horizontal sashing.

4. Here's a closer view:


5. Place a pin right where the ruler crosses the horizontal sashing. Continue across the row.


6. Place the next row of blocks (it won't have horizontal sashing) on top of the row with horizontal sashing. Match the pins up with the seams on this row of blocks:


7. Add pins as necessary to secure. I use lots of pins for this step so the blocks don't shift while sewing.

8. See? Lined up perfectly!


This quilt is at Ruth's Stitchery being quilted by Vivian -- I'll post a photo as soon as it is finished!

Have you entered my 4th Blogiversary giveaway? Go to Saturday's post, here, to comment for a chance to win one of four giveaways!


From the desk of your auntmartisignature