Eek! I added another Block of the Month project!
However, I'm doing pretty well keeping up on all my BOMs. I have all but two up-to-date. Here are the Blocks of the Month projects I've worked on so far in April.
First, last year's block party from Ruth's Stitchery. It's the "Amish With a Twist" quilt designed by Nancy Rink. The fabrics are Marcus Fabrics' Centennial Solids collection. The sashing fabric in the kit is black, but since this version came out, they've added kits with other background colors. I'm thinking I'll use a grey-blue for the sashing. It will be eight months before I have all the blocks finished, so there is plenty of time to decide!
My second BOM project is "Ryokan" by Joe Wood for ThimbleCreek Quilts. When I made my fourth block, I forgot I had been using Moda Marbles for the "barn blocks." I used Kona cotton solids on the most recent one, but I think it will look fine when I get all the blocks completed. I love the way my Daiwabo ombre works for the sashing -- I think it looks like cobblestones.
Next up is a current block party, also at Ruth's Stitchery. "Vintage Memories" is a BOM pattern by Sherri K. Falls for This & That Patterns. We're using "Gallery in Red and Bloue" by Faye Burgos for Marcus Fabrics. Even though I'm not a real fan of blue, I chose the blue colorway for this project. Each pair of blocks I complete makes me more glad I chose the blue fabrics.
With the help of Marti Michell, I'm making rapid progress on my "Farmer's Wife" blocks. The most recent template conversion chart only had three blocks that I haven't already finished. The are (left to right) #35 Flower Basket, #54 Kitchen Woodbox and #92 Streak of Lightning. I know I have more than half the blocks complete; guess I need to count them to see how many I still have left to piece.
The 2010 Patchwork Party quilt also uses Marti Michell's templates. The blocks are turning out so pretty, I'm sorry I didn't make it earlier. Clockwise from upper left, the blocks are: Five Geese Flying, Ladies Sashay, Rocky Mountain Chain and Bloom Where You Are Planted.
The tenth block of the 2012 Designer Mystery BOM is complete. "Sunday Drive" was designed by Polly Minick and Laurie Simpson. I'm really looking forward to putting this quilt together, I just love the fabrics.
.
My newest BOM is "Toes in the Sand," which uses Julie Herman's clever Hex N More ruler. I only have two blocks so far, but I love the Tula Pink fabric used in the Quilt Asylum's version of this quilt.
Linking up to BOM Rehab at Pink Pincusion. This ought to impress the other re-habbers
No Finish it Up Friday tomorrow because I'm heading south to the Pueblo Quilt Expo. Whee!
From the desk of your
Thursday, April 4, 2013
Wednesday, April 3, 2013
WIP Wednesday: April UFO
For the 13 in 2013 UFO Challenge, my April project is one I began last summer at Quilt Colorado 2012.
The designer and teacher, Linda Ballard, had lots of tips and tricks. For example, a new way to make half-square triangles (HSTs).
First, cut one square of light fabric at 6 1/4" and another of medium or dark fabric at 6 1/4". Place them right sides together and draw a line diagonally across corner to corner both ways. I'm using the "Quilter's Magic Wand" from Deb Tucker's Studio 180 Design, which marks two lines exactly 1/2" apart.
Stitch on each line (or 1/4" away from each line if you drew only one line in each direction).
Next, cut diagonally between the stitching both directions:
Press all the pieces toward the medium or dark. The HSTs are oversized, so you'll need to square them up to 2 1/2". My favorite way to square up HSTs is to use the Block Loc -- see my Tuesday Tool post for it here.
Each set of two 6 1/4" squares makes eight HSTs. Fast, huh?
I have the entire quilt cut out:
And one block made:
This quilt has a built-in pieced border. I can't wait to see how it turns out.
Linking up to WIP Wednesday at Freshly Pieced, hosted this week by Natalie of Greenleaf Goods.
Come back tomorrow to see my April BOM Rehab!
From the desk of your
The designer and teacher, Linda Ballard, had lots of tips and tricks. For example, a new way to make half-square triangles (HSTs).
First, cut one square of light fabric at 6 1/4" and another of medium or dark fabric at 6 1/4". Place them right sides together and draw a line diagonally across corner to corner both ways. I'm using the "Quilter's Magic Wand" from Deb Tucker's Studio 180 Design, which marks two lines exactly 1/2" apart.
Stitch on each line (or 1/4" away from each line if you drew only one line in each direction).
Cut vertically across the center, then horizontally across the center.
Next, cut diagonally between the stitching both directions:
Press all the pieces toward the medium or dark. The HSTs are oversized, so you'll need to square them up to 2 1/2". My favorite way to square up HSTs is to use the Block Loc -- see my Tuesday Tool post for it here.
Each set of two 6 1/4" squares makes eight HSTs. Fast, huh?
I have the entire quilt cut out:
And one block made:
This quilt has a built-in pieced border. I can't wait to see how it turns out.
Linking up to WIP Wednesday at Freshly Pieced, hosted this week by Natalie of Greenleaf Goods.
Come back tomorrow to see my April BOM Rehab!
From the desk of your
Tuesday, April 2, 2013
Tuesday Tool: Curved Piecing
Many quilters fear curved piecing. However, with the right tools and a little care, it isn't difficult.
My favorite trick is this special sewing machine presser foot:
The Curve Master foot fits most sewing machines. I use it on my Juki 2010, and also on my Viking.
Aside from careful cutting, the most important trick to stitching curved pieces together is understanding the "give" of fabric. Many curved piecing instructions insist on lots of pins -- I use only one, to mark the center of both pieces.
Pin once in the center, then begin stitching with the convex (outward) curve on top, matching the beginning edge of both pieces of fabric:
As you stitch, align both layers by lifting the fabrics and stretching slightly so they are flush:
I also slightly shorten my stitch length, but try with your normal stitch length first. As you stitch across the curve, stretching the fabric eases the longer edge of the convex curve onto the concave curve.
A little light pressing (with steam) and the seam will lie perfectly flat!
To add one row of apple core pieces to the next, treat each piece the same as you did when adding two single apple core pieces together.
Continue down the length of the strip until both strips are joined.
Once you've mastered the gentle curve of the apple core blocks, the more severe curve of Solomon's Puzzle will be a snap!
Come back tomorrow to see my April UFO project, "Mystery at Quilt Colorado," designed by Linda Ballard.
From the desk of your
My favorite trick is this special sewing machine presser foot:
The Curve Master foot fits most sewing machines. I use it on my Juki 2010, and also on my Viking.
Aside from careful cutting, the most important trick to stitching curved pieces together is understanding the "give" of fabric. Many curved piecing instructions insist on lots of pins -- I use only one, to mark the center of both pieces.
Pin once in the center, then begin stitching with the convex (outward) curve on top, matching the beginning edge of both pieces of fabric:
As you stitch, align both layers by lifting the fabrics and stretching slightly so they are flush:
A little light pressing (with steam) and the seam will lie perfectly flat!
To add one row of apple core pieces to the next, treat each piece the same as you did when adding two single apple core pieces together.
Continue down the length of the strip until both strips are joined.
Once you've mastered the gentle curve of the apple core blocks, the more severe curve of Solomon's Puzzle will be a snap!
Come back tomorrow to see my April UFO project, "Mystery at Quilt Colorado," designed by Linda Ballard.
From the desk of your
Monday, April 1, 2013
March UFO Parade
Look at you! Twelve quilters sent photos of their March UFO finishes -- and several of you finished more than one UFO in March.
I also finished my #1 UFO, the 2010 Colorado Shop Hop quilt:
When I worked at University of Denver, a co-worker and I "hopped" every summer. Linda was one of those people who would learn to quilt "when she retired." So she often bought color-coordinated bundles of fat quarters "just because it's pretty." She asked me once "what do people do with these bundles of fabric?" I answered, "Well, some people take them apart and make quilts from them!"
The funniest part of that story is, when Linda retired from DU a few years ago -- she learned to knit!
Before the parade begins, here is the selection for April's UFO:
And the other is a cute usage of a pre-printed panel:
Deb hasn't blogged these quilts yet, but you really should go to her blog, here, to read about her Bow Tucks bag!
Go here to see Deb's other March finishes. Way to be ahead of the Holiday Curve, Deb!
Lyndsey took advantage of the UK holiday weekend to finish a pile of projects. Here is her holiday quilt, but go to her blog to see her other goodies!
Susan-down-under (should that be capitalized?) "only" managed two finishes this month. I love her hand-embroidered wall hanging:
as well as her clever use of buttons in place of applique'! Go to her blog, here, to read the details.
This next one is a husband-wife tag team finish. Idaho friend Martha's husband tiled their bath, and she made a shower curtain to match. Isn't this incredible?
I don't know which came first, the curtain or the tile, but I love how the colors echo each other!
Sandi listened to nagging from me, and from another quilty friend, to include the brown-tan-orangey bits in this gorgeous quilt. I love the way it turned out, read the details about Khambray on her blog, here.
And be sure to look for Sandi's "Seven Sisters Simplified" quilt, with a bit of purple repro fabric from Yours Truly! I think I need to add that to my "Lifetime Quilts" list.
Irene has collected denim "chopped from every pair of jeans my husband, daughter and one son have worn" and has put it to good use. I think this is the prettiest "rag" quilt I've ever seen!
Here is the link to Irene's new blog, A Serendipitous Retirement. If you go visit, give her some comment love!
Noela is on a "bag kick" this year. Here is her March finish, "Lucy's Beach Bag."
Here is the link to her blog post about her weekend retreat at The Outlook at Boonah. Another place I want to visit if the George Washington and My Little Sailor pull into port at Brisbane!
Sooli is cleverly practicing her free-motion quilting by making dog beds. I hope the detail of her quilting shows up on the second photo, because it is incredible!
Read all about it here and here.
Since several of this month's "finishes" were scrap quilts, I think the prize for March should be a new scrap book. I love Kim Brackett's books, and her newest one has some really great designs.
Let's see, 16 photos, and Random.org chose:
Which turns out to be Debra for her Redwork "Four Seasons in the Garden"! How nice, I know you like to make scrappy quilts! Send me your mailing address and I'll send you the book. And maybe a few of my scraps?
Have fun with your #2 UFO. If I've missed your March finish, or left out a blog link, plz 2 adviz. I'll update the post as needed!
From the desk of your
I also finished my #1 UFO, the 2010 Colorado Shop Hop quilt:
When I worked at University of Denver, a co-worker and I "hopped" every summer. Linda was one of those people who would learn to quilt "when she retired." So she often bought color-coordinated bundles of fat quarters "just because it's pretty." She asked me once "what do people do with these bundles of fabric?" I answered, "Well, some people take them apart and make quilts from them!"
The funniest part of that story is, when Linda retired from DU a few years ago -- she learned to knit!
Before the parade begins, here is the selection for April's UFO:
#2
My #2 UFO is from Quilt Colorado 2012 -- I'll share the details on WIP Wednesday.
I promised Debra that her "Floribunda" quilt would lead this month's parade because somehow it got lost in my computer last month. And what a loss, because this quilt is lovely:
No slacker, our Debra, she also finished this redwork embroidered pretty, "Four Seasons in the Garden" by Bird Brain Designs. She plans to give this to her mom for her April birthday. Lucky Mom!
Be sure to click on the photo so you can see the detail in this quilt. It is truly stunning!
Deb C. also has two finished this month, one is an oldie-but-goodie she started 15 years ago for her late mother-in-law and has finished for her niece:
And the other is a cute usage of a pre-printed panel:
Deb hasn't blogged these quilts yet, but you really should go to her blog, here, to read about her Bow Tucks bag!
Next up is Kerry's "extra credit" finish for 2013. And "extra credit" is right! Just look at this beauty:
I copied Kerry's story behind her "Dear Jane."
Nurse Jessi is the third quilter to accomplish multiple finishes this month -- three! First up, she calls her "Hexi Bag" her "actual UFO that counts":
But she also finished this quilt for her grandbaby, Ainsley's "big girl bed." I love the ric rac!
And she also finished this Oakshott pillow sham:
This is actually my extra credit #13 Dear Jane project. It was started in 2011 with blocks given to me by my quilting friends for my 50th birthday. Worked on it the last two years at Brenda Papadakis’s workshop at Empty Spools Seminar in Asilomar CA. Put the last blocks together with the help of my friend Sandi Delman. If that is not enough, I just started another Dear Jane in Red/White/Blue!
Nurse Jessi is the third quilter to accomplish multiple finishes this month -- three! First up, she calls her "Hexi Bag" her "actual UFO that counts":
But she also finished this quilt for her grandbaby, Ainsley's "big girl bed." I love the ric rac!
And she also finished this Oakshott pillow sham:
PS, Jessi sometimes sells her finishes via her etsy shop.
While Deb S. also has multiple finishes this month, she features these darling Christmas stockings:
Lyndsey took advantage of the UK holiday weekend to finish a pile of projects. Here is her holiday quilt, but go to her blog to see her other goodies!
Susan-down-under (should that be capitalized?) "only" managed two finishes this month. I love her hand-embroidered wall hanging:
as well as her clever use of buttons in place of applique'! Go to her blog, here, to read the details.
This next one is a husband-wife tag team finish. Idaho friend Martha's husband tiled their bath, and she made a shower curtain to match. Isn't this incredible?
I don't know which came first, the curtain or the tile, but I love how the colors echo each other!
Sandi listened to nagging from me, and from another quilty friend, to include the brown-tan-orangey bits in this gorgeous quilt. I love the way it turned out, read the details about Khambray on her blog, here.
And be sure to look for Sandi's "Seven Sisters Simplified" quilt, with a bit of purple repro fabric from Yours Truly! I think I need to add that to my "Lifetime Quilts" list.
Irene has collected denim "chopped from every pair of jeans my husband, daughter and one son have worn" and has put it to good use. I think this is the prettiest "rag" quilt I've ever seen!
Here is the link to Irene's new blog, A Serendipitous Retirement. If you go visit, give her some comment love!
Noela is on a "bag kick" this year. Here is her March finish, "Lucy's Beach Bag."
Here is the link to her blog post about her weekend retreat at The Outlook at Boonah. Another place I want to visit if the George Washington and My Little Sailor pull into port at Brisbane!
Sooli is cleverly practicing her free-motion quilting by making dog beds. I hope the detail of her quilting shows up on the second photo, because it is incredible!
Read all about it here and here.
Since several of this month's "finishes" were scrap quilts, I think the prize for March should be a new scrap book. I love Kim Brackett's books, and her newest one has some really great designs.
Let's see, 16 photos, and Random.org chose:
Which turns out to be Debra for her Redwork "Four Seasons in the Garden"! How nice, I know you like to make scrappy quilts! Send me your mailing address and I'll send you the book. And maybe a few of my scraps?
Have fun with your #2 UFO. If I've missed your March finish, or left out a blog link, plz 2 adviz. I'll update the post as needed!
From the desk of your
Sunday, March 31, 2013
Scrap Basket Sunday
Ah, ha! I'm not the only quilter who dedicates Sundays to scrapping! Kim at "Kim's Big Quilting Adventure" has launched a "Sunday is for Scraps" link-up.
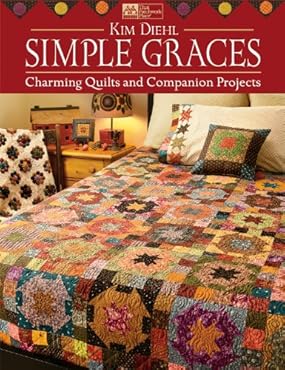
She's calling it "Scrap Basket Sunday," and invites you all to dig through your scraps and make a few "scrappy" blocks each week. Kim is making the quilt on the cover of Kim Diehl's book, Simple Graces:
I thumbed through Kim Bracket's newest book, Scrap Basket Beauties:
Then I remembered a box labeled "Apple Core." It's been sitting on a high shelf in my sewing room for years, really, years. I took it down and discovered I had cut a pile of apple core pieces using Shar Jorgenson's Apple Core template:
(By the way, if you're interested, it's on sale right now!)
Here is my stack of apple cores:
And here is the strip of sewn-together cores:
Thanks, Kim, for the motivation to work on this 10+-year-old scrapple project! Reader, if you'd like to play along with Kim's "Scrap Basket Sunday," go here to share your link and see what others are making.
I have a special foot for my machine that makes sewing the curved seams of the apple cores a snap. Come back Tuesday for my Tuesday Tool post featuring the Curve Master presser foot.
And remember, this is the last day to submit your March UFO for tomorrow's 13 in 2013 UFO Parade!
From the desk of your
She's calling it "Scrap Basket Sunday," and invites you all to dig through your scraps and make a few "scrappy" blocks each week. Kim is making the quilt on the cover of Kim Diehl's book, Simple Graces:
I thumbed through Kim Bracket's newest book, Scrap Basket Beauties:
Then I remembered a box labeled "Apple Core." It's been sitting on a high shelf in my sewing room for years, really, years. I took it down and discovered I had cut a pile of apple core pieces using Shar Jorgenson's Apple Core template:
(By the way, if you're interested, it's on sale right now!)
Here is my stack of apple cores:
And here is the strip of sewn-together cores:
Thanks, Kim, for the motivation to work on this 10+-year-old scrapple project! Reader, if you'd like to play along with Kim's "Scrap Basket Sunday," go here to share your link and see what others are making.
I have a special foot for my machine that makes sewing the curved seams of the apple cores a snap. Come back Tuesday for my Tuesday Tool post featuring the Curve Master presser foot.
And remember, this is the last day to submit your March UFO for tomorrow's 13 in 2013 UFO Parade!
From the desk of your